



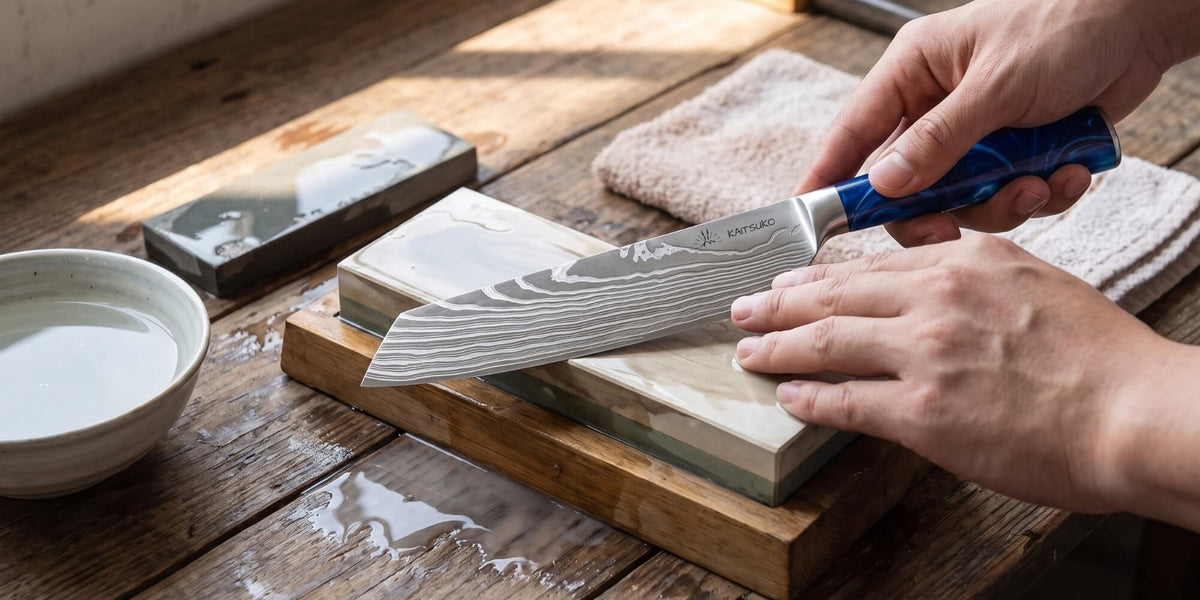
A Japanese knife is sharpened on a water stone at a 15° angle per side, in three stages: 1000 grit to reset the edge, 3000 grit to refine it, then a few very light passes to remove the burr. Allow about twenty minutes for your first time, and less than ten once you have mastered the technique.

Two figures distinguish it from a standard kitchen knife. Its steel is harder, around 60 HRC for our Damascus steel ranges, and its sharpening angle is narrower: 15° per side instead of 20°. It cuts better and stays sharp longer, but it does not respond well to electric sharpeners or heavy pressure with a honing rod. Here is the step-by-step method we recommend at Kaitsuko, with specific notes on Damascus steel knives, the santoku, and the use of a honing rod.
|
Key point |
Key takeaway |
|---|---|
|
The tool |
A double-sided water stone, 1000 and 3000 grit |
|
The angle |
15° per side, which means raising the spine by about 12 mm for a blade 45 mm wide |
|
The motion |
Apply pressure when the spine of the blade moves first, release on the return |
|
Signal to change sides |
The burr, a fine metal edge felt on the opposite side |
|
Time |
20 minutes for the first time, 5 to 10 minutes thereafter |
|
Damascus knife |
Same method: only the bevel touches the stone, the pattern remains untouched |
This method applies to double-bevel knives, sharpened on both sides, such as our Damascus blades. Single-bevel blades (yanagiba, deba, usuba) require a different sharpening process.
Why a Japanese knife is not sharpened like a standard knife
A Japanese blade has different steel, a different angle, and a different thickness compared to a European knife, and each of these differences affects how it should be sharpened.
First, the steel is harder. A Western knife usually falls between 55 and 58 HRC. The Kaitsuko Damascus steel collections (Kyoto, Yakumoto, Yellow Sea Series, Spectre) and the Kaito range are based on 10Cr15CoMoV steel hardened to approximately 60 HRC. Hard steel retains its edge longer. Conversely, it does not bend, and under too much strain, it may chip.
The angle is also different. Our Damascus blades are delivered with a 15° per side edge, whereas a European knife is most often sharpened at 20°. Five degrees less means less material behind the edge. The cut gains in finesse, but the edge is less forgiving of mishandling.
Finally, there is the thickness. A Japanese blade is thin along its entire height, and it reacts poorly to tools that remove metal rather than abrading it.
In all three cases, you need a tool that allows you to choose the grit, maintain the angle, and control the pressure. A water stone makes this possible, which is why it remains the gold standard for sharpening Japanese knives. Our Chef Tanaka range, made of 5Cr15MoV steel at around 54 HRC, is more forgiving. The following method is perfectly suitable for it; it will simply require fewer passes.
The equipment: a stone, water, and almost nothing else
To sharpen a Japanese knife, a single double-sided 1000 and 3000 grit sharpening stone is sufficient in most cases. The number indicates the fineness of the abrasive. The lower the number, the more the stone "bites" and removes metal. The higher the number, the more it polishes.
|
Grit |
Purpose |
When to use |
|---|---|---|
|
400 |
Repairing: removing a chip, fixing a damaged bevel |
Rarely, on a damaged blade |
|
1000 |
Sharpening: recreating an edge on a dull blade |
For every major sharpening |
|
3000 |
Refining: smoothing the edge left by the 1000, maintaining a blade that is still decent |
After the 1000, or alone for maintenance |
|
6000 to 8000 |
Polishing: a mirror edge for raw fish |
Optional |
Those who want all four grits can find them in our two-stone kit (400/1000 and 3000/8000), delivered with a non-slip base and an angle guide. If you are hesitant between several models, our guide on how to choose your sharpening stone reviews materials and formats.
Around the stone, you need very little: a bowl of water, a damp cloth to place under the stand so it doesn't move, a dry cloth, a felt-tip pen, and a sheet of newspaper for the finishing. Clear your workspace and set yourself up under good lighting. Many failed sharpening attempts are caused by a stone that slips or a bevel you cannot see.
Before you start: prepare the stone and find the angle
Soak and stabilize the stone
Submerge the stone in water until it stops releasing bubbles, which usually takes 5 to 10 minutes. Some newer stones do not require soaking and only need to be wetted on the surface. When in doubt, follow the manufacturer's instructions. Then, place the stone on its stand with the 1000 grit side facing up, and keep the bowl within reach, as the surface must remain wet from start to finish.
Very quickly, a grey slurry (mud) will appear. Do not rinse it off. This mixture of water, stone grit, and steel particles helps the stone work more finely.
Finding 15° without a protractor
The angle is determined by the height of the blade's spine above the stone. This height is equal to the width of the blade multiplied by 0.26. For a santoku or a chef's knife 45 mm wide, the spine should be about 12 mm from the stone. For a paring knife 25 mm wide, it should be 6 or 7 mm.
You will often read that placing two coins under the spine is sufficient. With 1-euro coins, this reference is accurate for a narrow blade, 18 mm wide. For a 45 mm santoku, you need five. Stacked, they reach 11.65 mm, which gives you almost exactly 15°. Try it once to memorize the height, then remove the coins. Our sharpening angle guide provides a table based on blade width.
If your stone comes with an angle guide, that little clip that slides onto the spine of the blade, use it during your first sessions. It raises the spine by a fixed height, meaning the resulting angle changes with the width of the blade. A felt-tip marker check is still useful.
For this check, draw a line with the marker on the bevel on both sides, then make three passes on the stone. If the ink has disappeared across the entire width of the bevel, the angle is correct. If it only disappeared at the very edge, the blade is raised too high. And if it only remains at the top of the bevel, the blade is held too flat relative to the existing bevel. On a blade already sharpened at a different angle, rely more on the height of the spine.
Finding 15° is easy enough; keeping it consistent throughout the motion is much harder. Lock your wrist and let your entire arm move back and forth. Also, listen carefully. A consistent angle produces a consistent hissing sound; if the noise changes from one pass to the next, the angle has shifted.
Sharpening a Japanese knife on a stone: the six-step method
Step 1: The grip
Hold the handle in your dominant hand, with your index finger extended along the spine of the blade and your thumb flat on the side. Place the knife diagonally on the stone at an angle of approximately 45°, with the edge facing you. Place two or three fingers of your other hand on the blade, just above the edge, at the spot you want to sharpen. These fingers apply the pressure, never overhanging the edge. The hand holding the handle simply maintains the angle.

Step 2: The first side, 1000 grit
Slide the blade along the entire length of the stone, forward and backward. Apply pressure when the spine moves forward (i.e., when you are pushing the blade away from you). On the return, release the pressure and let it glide back. This direction of movement has two advantages: the edge forms without jolts, and it is less likely to cut into the stone.
A blade is not sharpened in one go. Divide it into three zones: the tip, the middle, and the heel, and work them one after the other by moving your support fingers. On the curved part near the tip, slightly lift the handle so that the bevel remains in contact with the stone.
Do not count the passes; look for the burr. This tiny metal ridge forms on the side opposite the one you are sharpening, signaling that the stone has reached the edge. To feel it, run your fingertip from the spine toward the edge, never along the edge itself. If your finger catches, the burr is there. Wait until you feel it along the entire length, from heel to tip, before turning the knife over. On a maintained blade, it appears in a minute or two. On a very dull blade, allow for five minutes, sometimes more.
Step 3: The second side
Turn the knife over; the edge now faces away from you. Use the same diagonal, the same spine height, and the same three zones. The pressure rule remains the same: apply pressure when the spine moves forward, so this time, when pulling the blade toward you.
This side is always less natural than the first, and the angle tends to drift. Repeat the felt-tip test at the slightest doubt. Stop once the burr has flipped to the other side along the entire length. To keep a centered edge, give each side roughly the same amount of working time.
Step 4: Refine with 3000 grit
Switch to the 3000 grit by flipping the stone, or by taking the second stone if using a kit, soaked at the same time as the first. Work both sides again, with half as many passes and half the pressure. The 3000 grit is not really for sharpening anymore; it removes the scratches left by the 1000 grit and reduces the burr. It is responsible for that smooth sensation when the blade glides into a tomato.
If you have a 6000 or 8000 grit, this is the time to use it, with even less pressure. For an everyday kitchen knife, 3000 grit is more than enough.
Step 5: Remove the burr
A knife that leaves the stone with its burr still intact will cut very well that first evening but much less well the following week, because the ridge will bend or break off, taking the edge with it.
To eliminate the burr, make alternating passes on the fine grit, one per side, using only the weight of the blade for pressure, five or six times. Finish on a folded sheet of newspaper or a piece of leather placed flat. Maintain the sharpening angle and pull the blade spine-first, three or four times per side.
Step 6: Check, rinse, dry
Hold a sheet of paper from the top and slice it from heel to tip, away from your fingers. A well-sharpened blade will cut through it in one stroke, without any tearing sound. If it catches at a specific spot, rework that area on the fine grit.
Rinse the blade with clean water to remove steel particles, wipe it immediately, and store it dry. Also, rinse the stone, let it dry in the open air, lying flat and away from a heat source, and do not store it damp in its box.
Guidelines for a first session
The first few times, you may feel like you are rubbing without achieving anything. This is normal; your hand needs a few sessions to find its consistency. Start with a knife you aren't afraid to scratch rather than your finest blade. Plan for five minutes per side on the 1000 grit, two on the 3000 grit, and aim for constant pressure rather than strong pressure.
If the burr does not appear after five minutes, the problem almost always lies with the angle. The blade is held too flat, and the bevel is not touching the stone all the way to the edge. Repeat the felt-tip test before persisting.
Over time, the stone becomes concave in the center, where the blade passes most often, and a concave stone ruins the angle. To flatten it, grid the surface with a pencil, then rub it on a flattening stone or on wet sandpaper placed on a perfectly flat surface. When the grid has disappeared everywhere, it is flat again.
How to sharpen a santoku, a nakiri, a kiritsuke, or a paring knife
The method does not change from one Japanese knife to another. Only how you follow the edge adapts to the shape of the blade.
|
Knife |
Characteristic |
Adapted motion |
|---|---|---|
|
Santoku |
Almost straight edge, short curve toward the tip |
Easiest for beginners: two zones are often enough |
|
Chef's knife (gyuto) |
Curved belly on the last third |
Lift the handle as you approach the tip |
|
Nakiri |
Straight edge along the entire length |
Keep the handle at the same height from end to end, without rounding the ends |
|
Kiritsuke |
Fine, angular tip |
Lighten the pressure on the last two centimeters |
|
Paring knife |
Short, narrow blade |
Spine at only 6 or 7 mm, short passes, support fingers grouped together |
|
Bread knife |
Serrated blade |
No flat stone: the technique is different |
Left-handed users have nothing special to prepare. A Japanese knife with a symmetrical double bevel is sharpened the same way, simply by reversing hands.
Sharpening a Damascus steel knife without damaging the pattern
People are often hesitant to sharpen a Damascus steel knife for fear of erasing the pattern. This fear is unfounded, and one only needs to look at how the blade is constructed to understand why.
Kaitsuko Damascus blades are made using san mai. A core of hard steel, 10Cr15CoMoV, is sandwiched between layers of softer steel that create the ripples. This is the 67-layer construction indicated on our product pages. The core cuts, while the outer layers protect it. However, when sharpening, only the bevel touches the stone—that is, a very narrow strip along the edge where the core is exposed. The pattern is located higher up on the sides. You can sharpen a Japanese Damascus steel knife for years without ever touching the design.
The method therefore remains the same, with three precautions. Keep your 15° angle, because if you lay the blade too flat, the side will rub instead of the bevel and the stone will scratch the design. Rinse off the sharpening sludge that rises onto the sides with water before drying the blade with a soft cloth, without scrubbing, as this sludge is abrasive. And when washing, forget the green side of the sponge and scouring powders.
In a properly executed job, the pattern is only truly affected during thinning, when a sharpener grinds the entire height of the blade after many long years of use. The design becomes matte, then is revived by a surface treatment in the workshop. This work is not done at home.
The same applies to a hammered blade, such as those in our Kaito range. The hammering is located on the upper part of the blade, far from the edge, and sharpening does not reach it.

Can you sharpen a Japanese knife with a honing rod?
To sharpen it, no. A honing rod straightens an edge that has rolled and removes almost no metal. To maintain it between two sharpening sessions on a stone, yes, provided you adapt your movement to the hardness of the steel.
On steel around 54 HRC, like that of our Chef Tanaka range, the edge rolls before it wears down. A few light passes once or twice a week will straighten it out, and the knife will regain its bite in ten seconds.
On 60 HRC steel, the edge wears down or chips more than it rolls, and the rod has little to straighten. Handled with force, a ridged steel rod can even cause tiny chips on a 15° cutting edge. On our Damascus and Kaito blades, limit yourself to a few pressure-free passes at 15°, or prefer a 3000 grit stone. A ceramic honing rod, with its fine, regular grit, is also suitable for these steels, always without applying pressure.
The complete technique is described in our guide on how to use a honing rod.
Sharpening a Japanese knife correctly: mistakes to avoid
|
The mistake |
The result |
The right habit |
|---|---|---|
|
Changing the angle midway |
A rounded bevel that no longer bites |
Locked wrist, marker test |
|
Applying heavy pressure |
A large burr, a fragile edge, a stone that hollows out |
Two-finger pressure, no more |
|
Letting the stone dry |
It clogs and scratches instead of wearing down |
Rewet as soon as the surface dulls |
|
Sharpening only the middle of the blade |
A hollow forms, the blade no longer touches the board along its entire length |
Three zones, the same amount of time on each |
|
Turning the knife over before a burr forms |
An edge formed only in places: some zones cut, others don't |
Check with your finger, from heel to tip |
|
Skipping the burr removal step |
An edge that collapses in a few days |
Alternating passes, then newspaper |
|
Taking out the 400 grit by habit |
Metal removed for no reason, a blade that wears out faster |
Use 400 only for a chip |
|
Running the blade through an electric sharpener |
Too much metal removed, risk of chipping on hard steel |
The stone, or a manual sharpener set to 15° |
A tiny chip can be erased with a 1000 grit stone by focusing on that area. A chip visible to the naked eye requires a coarser grit, and we detail this process in our article on a chipped Japanese knife.
Between sharpenings: signs that it's time for the next one
Stone sharpening lasts several months in an everyday kitchen, longer on a 60 HRC Damascus steel knife than on softer steel. Benchmarks by steel type and usage are in our article on how often to sharpen a knife, along with four tests to check sharpness.
The calendar counts for less than the signs. When the blade slides on a tomato skin instead of piercing it, when the onion is crushed under the edge, when you have to press where the blade used to glide on its own, it is time to sharpen. Do not wait until the knife stops cutting altogether, because the more damaged the edge, the more metal you have to remove to restore it.
And if you prefer to forgo the stone, other tools exist, provided you choose them carefully. We compare the stone, the honing rod, and the manual sharpener in a separate guide.
FAQ: Sharpening a Japanese knife
What angle should I use to sharpen a Japanese knife?
Count on 15° per side for a double-bevel Japanese knife, for a total of 30°. Some very thin blades go down to 12°. The safest bet is to maintain the knife's original angle. Our Damascus blades, for example, are sharpened to 15° per side.
What grit stone for a Japanese knife?
A 1000 grit for sharpening, then a 3000 grit for refining. This pair is enough for most Japanese knives. The 400 grit is only used to repair a chipped blade. A 6000 or 8000 grit provides a mirror polish, which is nice but optional in the kitchen.
How long should you soak a sharpening stone?
Until it no longer releases bubbles, which is 5 to 10 minutes for most water stones. Some newer stones simply need to be wet on the surface, as noted in their instructions. In any case, the stone must remain wet throughout the sharpening process.
Sharpening stone: water or oil?
Water. Stones intended for kitchen knives, including those we sell, are water stones. They should be soaked or wetted, and never oiled. Oil is reserved for stones designed for it, such as certain natural workshop stones. A water stone that has been exposed to oil will clog and will no longer bite correctly.
What is a knife burr?
The burr is a thin ridge of metal that forms along the edge during sharpening, on the side opposite the one rubbing against the stone. It proves that the abrasive has reached the cutting edge. You can feel it by sliding your finger from the spine toward the edge, then remove it with a few very light passes.
Does sharpening damage the pattern of a Damascus knife?
No. Only the bevel touches the stone, on a very narrow strip along the edge, and the pattern is located higher up on the blade. You just need to respect the 15° angle and rinse off the sharpening sludge before wiping the blade.
Can you use a manual sharpener on a Japanese knife?
Yes, if it respects the 15° angle and uses a fine abrasive, diamond or ceramic. It restores sharpness in about a minute. The stone retains the advantage for the fineness of the edge and the longevity of the blade, because it removes less metal.
How do you sharpen a Santoku?
A Santoku is sharpened like any double-bevel Japanese knife, on a water stone, at 15° per side, with 1000 grit then 3000 grit. Its almost straight edge makes it the easiest knife to learn on. Work zone by zone and look for the burr along the entire length before switching sides.
Kiritsuke or Gyuto: Which Chef Knife to Choose?