


How to properly sharpen a knife?
If you're having trouble cutting through the skin of a tomato or chicken, it may be a sign that yourknife needs sharpening . Even the best kitchen knives deteriorate with use. However, by sharpening them properly, you can restore their sharpness.
What is the best way to sharpen a knife?
When the sharpness of ordinary household knives deteriorates , it is recommended to use a " medium sharpening stone ". Rough sharpening surfaces are used to quickly repair a chipped blade by removing a large portion of the blade. Double-sided sharpening stones are very useful. "Medium" and "rough" sharpening stones can be used on both the front and back sides.
We provide an explanatory video.
Using a sharpening stone to maintain your knife requires preparation. Before you start, check your sharpening stone for bumps or small holes (even if they are very small). If this is the case, we invite you to use a "surface preparation stone" to flatten it and restore its smooth appearance. Then dip the sharpening stone in water.
Regular sharpening stones have small spongy cavities, so when you dip them in water, they will bubble. Soak them in water until there are no more bubbles, about 10 to 15 minutes. However, this may not be the case for some types of sharpening stones, so follow the instructions carefully. Prepare a container, bowl or bucket, in which you can dip the entire sharpening stone.
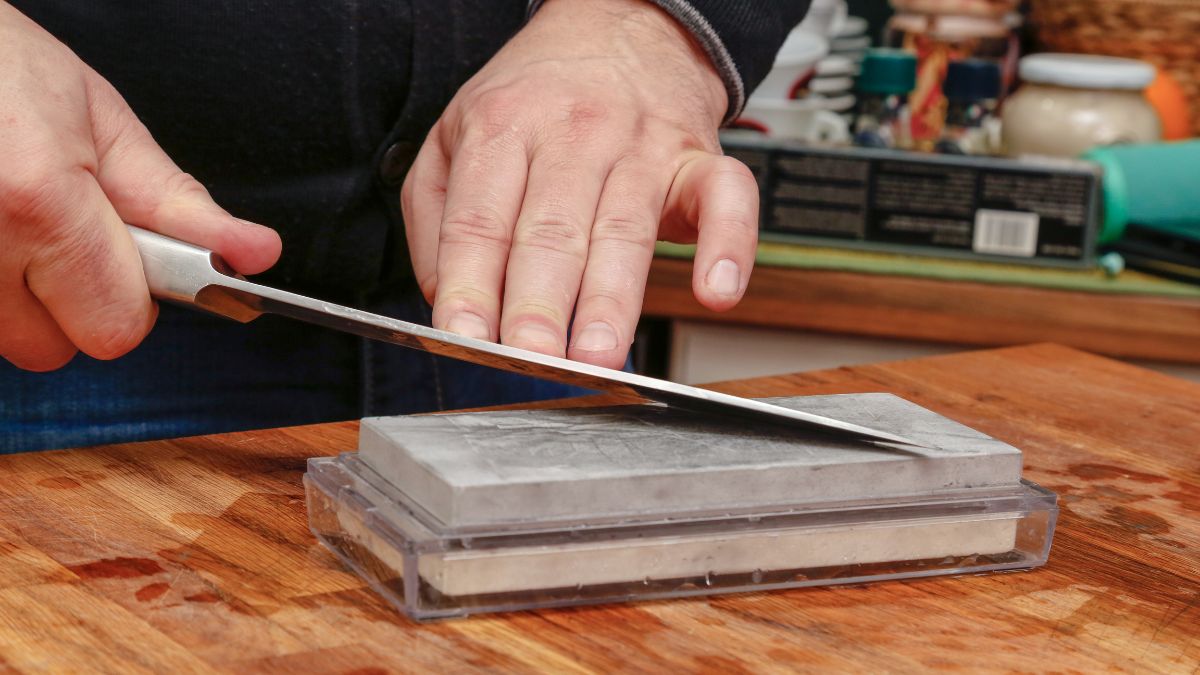
Hold your knife by the handle and place your index, middle and ring fingers on the blade and determine the angle at which your knife should be sharpened. For our Damascus knives, the sharpening angle should be between 15 and 20°.
At this point, be careful not to hurt your thumb by touching the edge of the blade. By firmly supporting these three points, the knife will not shake and can be sharpened at a stable angle.
Place the sharpening stone vertically flat and first decide at what angle the knife should be placed. The knife should be placed at a 45-60 degree angle to the sharpening stone.
Next, decide what angle the blade should be sharpened at (float angle). The knife should be slightly elevated so that there is about a 15-degree gap between the knife and the sharpening stone.
A rough guide for 15 degrees is to insert the "tip of your pinky finger" between the sharpening stone and the knife. Once you have set the angle here, it is important to keep it the same from the beginning to the end of the sharpening! You can use the tip of your pinky finger to check the angle as many times as you like until you get used to it.
Tip #1 The standard angle is 15 degrees, which is roughly the tip of your pinky finger. Once you decide on an angle, stick with it until the end!
When you plan to cut a variety of foods, it is best to sharpen the tip of the blade to about 30 degrees. This means that one side should be sharpened to 15 degrees.
Sharpen one side with the blade facing you.
Place the part of the blade to be sharpened at the front of the whetstone and lightly rest the index and middle fingers of the non-dominant hand on the whetstone.
Continue moving the center line to the back of the sharpening stone. At this point, be careful not to press too hard on your fingertips, as this will blur the 15° angle you initially set.

The particles of the whetstone are harder than the knife blade and are made in such a way that they can be sharpened effortlessly. When moving the blade from side to side or from back to front, sharpen it in a comfortable and effortless position, with the image of "caress + arm weight".
Tip #2 Hold the center of the sharpening stone along its entire length and width, back and forth with long, effortless strokes!
Sharpen by gradually moving the two fingers holding the sharpening point from the front edge of the blade to the center edge of the blade, and then to the tip of the blade. When the whetstone becomes dry, pour water on it to make it more slippery. Do not rinse off the blackish sharpening liquid on the surface of the whetstone, as it will facilitate smooth sharpening.
It is easy to make the mistake of lifting the blade from the whetstone of the sled (the curved part of the blade edge) and not securing the blade. To avoid this, lift the handle slightly and place the cutting edge against the whetstone. At this point, make sure that the 15° angle does not change. It is recommended to sharpen the sled along the curve, frequently offsetting it by about 1 cm.
This is the slightly floating state.
Raise the handle a little and it will fit the sharpening stone. Check for "burrs" to see if sharpening is complete.
To check whether it has been sharpened or not, check the burr (also called blade burr), which is formed when the metal near the tip is sharpened and deformed towards the opposite side. The presence of burrs is proof that the blade has been sharpened.
It is best to keep burrs to a minimum, as over-sharpening the blade will result in waste. A hair-sized burr is enough. Check by touching the tip of the blade with your index finger or middle finger to the edge without pressing down so as not to cut yourself. Be careful in which direction you move your fingers to avoid injuring yourself at that time. If you feel burrs all over the blade, OK!
Sharpen the opposite side with the blade on the other side
Hold the knife in a different way. With the blade on the other side, hold the handle with your dominant hand, this time with your thumb on the tip and your index finger extended and close to the blade, supporting it firmly at three points. As before, keep the gap between the knife and the sharpening stone at 15 degrees. Lightly apply both index fingers and the middle finger of your non-dominant hand and sharpen from the front to the back of the sharpening stone.
After sharpening the sled first, then the middle of the blade and finally the front of the blade, place the knife at a right angle to the whetstone, as the handle may hit the whetstone. At this point, the thumb of the left hand should rest on the pick for stability.
Tip #3 When sharpening the edge of the blade, hold the handle at a right angle to the whetstone. When the blade is sharpened at a right angle to the whetstone, the handle does not hit the stone.
Some people sharpen double-edged knives on only one side of the blade, but depending on the structure of the knife, such as "interruptions*", if you continue to sharpen only one side, the knife may no longer be able to cut at all. Double-edged knives should always be sharpened on both sides.
As before, gently touch the edge of the blade with your index, middle and ring fingers to check for burrs across the entire blade. The sharpening process is complete when you feel a hair tug on the tip of your finger.
Finish by removing any burrs.
Spread newspaper (or old jeans or other fabric) at the very edge of the support so that the blade is firmly attached to the knife handle without hitting it. Rub the surface of the blade against the newspaper to remove the burrs. While holding the blade at about 15 degrees, the same angle as when sharpening, gently move the knife sideways, and finally, lift the blade slightly and slide it upward, as if you were bending the burrs. Repeat this process several times on the front and back while checking that the burrs are removed. Since when sharpening, it is difficult for the tip of the blade to touch the newspaper, lift the handle slightly and adjust it so that it touches the tip of the blade.
If the blade is not sharp even though it has been sharpened, there may be burrs remaining. Remove the burrs completely by carefully moving the handle back and forth over the log.
Maintaining the whetstone after sharpening
After use, sharpen and flatten the bumpy whetstone. This is a very important task. The previous explanation of knife sharpening assumes that it should be done on a flat whetstone. If the whetstone is not well maintained after sharpening a knife, it is difficult to achieve a sharp edge even after sharpening.
A useful tool for checking where the dents are is a pencil. First, mark a circle on the sharpening stone with the pencil.
Next, scrape the surface. If pencil marks remain, this indicates that the area is still recessed. Scrape until the pencil marks are well erased (i.e. flattened).
Re-sharpening only takes a few dozen seconds if you do it every time. Make it a habit to always resurface after each sharpening. Sometimes people do this sharpening on concrete, asphalt, blocks, etc., but this is not recommended because it is not good for the blades. Once you are done, wipe down your sharpening stone and surface preparation stone and put them away.
How to sharpen knives?
To sharpen the knife, start from the part closest to the handle and finish with the tip. Slide the knife over the entire surface of the sharpening steel. The movements must be repeated constantly and at a good pace, repeating several times on each side of the knife.
What tool to sharpen a knife?
Sharpeners
Sharpeners are fiddly to use, but they take up little storage space and can be sharpened quickly and easily whenever you want to use them. Sharpen by placing the blade against the V-shaped groove made by the sharpening stone and sliding it forward.

It is important to note, however, that you can only sharpen knives with a whetstone. Sharpeners only sharpen the edge temporarily, but not permanently, and you must eventually sharpen them with a whetstone. They are also not suitable for knives made of hard materials.
Electric sharpeners
An even easier way to sharpen knives is to use an electric sharpener. The mechanism is almost the same as a manual one, the difference being that the part of the blade that touches the knife rotates automatically.

There is no need to slide the blade back and forth, which allows for quick sharpening. However, the price of the device is slightly higher than manual devices. Many of them are also large in size, so choose one with storage space in mind.
What is the difference between sharpening and honing?
Sharpening and honing have one big similarity: they’re both ways to keep your knives sharp and effective. But they’re not the same thing, even though the terms are often confused. To understand the difference, you first need to understand why knives get dull.
Why do knives get dull?
A knife can become dull for one of two reasons:
- the cutting edge is worn and/or
- the blade edge is no longer aligned correctly.
In other words, a knife that needs sharpening is one that no longer has any "teeth." A knife that needs sharpening has misaligned or bent teeth, which can happen as often as every time it is used.
Sharpening
Sharpening is simply the process of maintaining an already sharp edge. A honing steel pushes the edge of the blade into alignment. This can also be referred to as "folding the burrs". It is recommended to sharpen your knife frequently, some choose to sharpen their knives after each use.
Sharpening
Sharpening, on the other hand, involves removing material from the edge of the blade, usually by honing it against a whetstone. If you sharpen your knife regularly, you shouldn't need to sharpen it more than twice a year, depending on how often you use it.
What is the difference between sharpening and polishing?
Sharpening removes material from the blade to produce a new edge, while honing maintains the blade's sharpness by pushing the edge of the knife toward the center.
Source: Jean Linero, sharpener and grinder http://lameduremouleur.fr/
How to choose a Nakiri knife?
What is the Santoku knife used for?